
How to Mobilize – Part I
by Erik Castiglione
Greetings Relentless Family! Apologies for the lateness of this week’s post, I’ve been busy journeying into the land of the midnight sun. Despite this, I’ve managed to keep up with my mobility work. Have you? In the last two weeks we discussed the “What” and “Why” of mobility. Today, we have How to Mobilize – Part I.

Today is part 1, because we must differentiate between pre-workout mobility, post workout mobility, and remedial work. They are slightly different, and it’s important to do each. In this installment, we’re going to cover pre-workout mobility. This can be divided into three steps: self-myofascial release (SMR), mobilization, and activation. The actual exercises you choose for these drills will depend on what type of workout we’re doing that day. For the sake of this article, we’re going to use squat day as our example for all three steps.
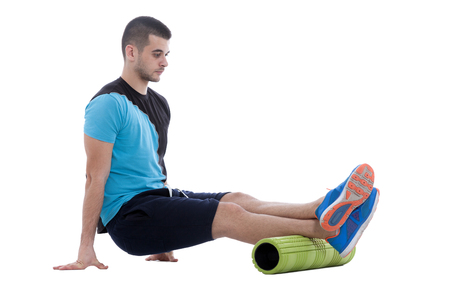
SMR is also known as soft tissue work. This includes foam rolling, trigger point therapy with a lacrosse ball or other mobility implement, and any other barbell rolling/tissue mashing you do. As you may recall from one of our Motivation Monday posts, this should be done with purpose. Sitting around chatting on a foam roller IS NOT SMR. Instead, target a few muscle groups, and hit each one with 8 to 10 passes, up and down. You should move at roughly 1 inch per second. If you find a particularly tight spot, stay there and pulse until you feel a release, then continue with your pass. For squat day, you’ll want to target your glutes, hamstrings, IT band (this is actually a misnomer, you’re really getting your lateral quad), quads, calves, and adductors.
Mobilization means putting your joints through their full range of motion – this requires MOVEMENT. For squat day, this includes exercises like spidermans, leg raises, and actual squats. Do 2-3 sets of 5-10 of each of these until you feel comfortable in each position and are no longer stiff or tight.

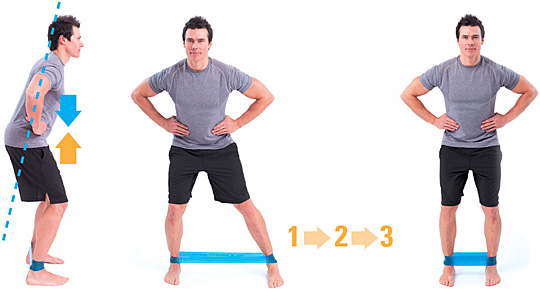
Activation exercises help wake up “sleeping” muscles to make sure everything is firing properly. Most of us have a hard time engaging our glutes and hips when we squat, so mini-band side steps and banded squats are good activation drills for squat day. Do 2-3 sets of 10-12 of each exercise; you should feel the target muscles starting to burn.
To reiterate, there are 3 steps to pre-WOD mobility, and we can illustrate them using squat day as an example:
Step 1: SMR – Foam roll glutes, hammies, calves, quads, IT bands, and adductors. Do 8-10 passes per muscle group, pausing if you feel a tight stop, otherwise moving at an inch per second.
Step 2: Mobilize – Do 2-3 sets of 5-10 spidermans, leg raises, and squats, until you feel comfortable in each position.
Step 3: Activate – Do 2-3 sets of 10-12 mini band side steps and banded squats to activate the glutes and hips. You should feel them burning by the end of this.
As you may have noticed, this is not an insignificant amount of work. It should take you 10-15 minutes to get through it, which is why you should be arriving to class 15 MINUTES EARLY instead of 1-2 (or 10) minutes late. You know who you are. Show up early, get your pre-workout mobility in, and you’ll have a better WOD because of it.
That’s all for part I. Stay tuned for part II where we discuss post WOD mobility and remedial work. Until then, stay relentless!