
Ready to Run?
by Erik Castiglione
Running, jogging, trotting, shuffling, coward practice – whatever you want to call it, it’s a big part of CrossFit. Hell, we’ve got “Murph” coming up on Monday, which involves 2 miles of running. I knock running because I hate doing it, in a large part because I haven’t been good at it in almost a decade. For a lot of people, running, and jogging specifically, are a gateway to fitness and “getting in shape.” Why? Because it requires no equipment, and it’s free.
But, is it a safe option? According to Coach Chris Hinshaw, who runs CrossFit Aerobic Capacity, it’s a great option. He says “People make the first step too complicated. Just get out of the door and run.” On the flip side, we have physical therapist Dr. John Rusin, who argues that running is the most injurious physical activity in the world, and that you should be in shape BEFORE you begin. So, who’s right?
They both are. It’s very easy to get out and go for a jog, BUT, when you’re starting out, as with ALL exercise, you need to ease in. This means limiting volume – go for short runs, and keep your total accumulated distance small. Also, limit intensity – increase pace GRADUALLY. Sprinting is a long way off if you’re just starting out. Build your volume of running BEFORE pushing the pace. If something hurts, STOP. And, make sure you work on your mobility issues. One of the great things about CrossFit is that we use a “good enough” approach. If you can perform a movement without pain or safety issues, we let you. It might not be picture perfect, but it’s good enough. And, we focus on getting to technical perfection through movement practice, regression, and progression. For example, if you can do handstand push-ups, are you going to stop doing regular push-ups? Of course not. We frequently regress and progress movements to suit our needs, and target the mobility issues that limit our technique. This applies to running as well. We want to focus on continuously improving our posture, gait, and mobility.
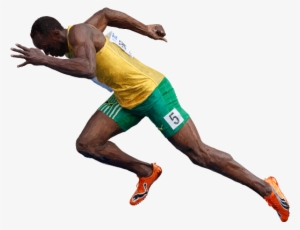
Posture – Hopefully this is self-explanatory: keep your hips tucked, and your body stacked. This means shoulders, knees, and hips are in a line. We don’t want any arched backs, or hunched shoulders. We control speed by leaning forward from the ankles, rather than bending at the waist. Our typical forward lean should be 6-7 degrees. We increase this angle to go faster. As a point of reference, a world class 10k runner will have a forward lean of 10 degrees, and Usain Bolt has been measured at a 19.5 degree angle.
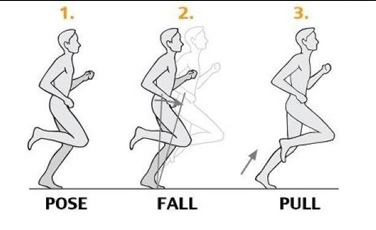
Gait – ideally, the BALL of your foot should be striking the ground, NOT your heel, as shown in the “Pose” part of the above illustration. Unfortunately, most people heel strike, and the vast majority of running shoes perpetuate this. Since people heel strike, they need comfort for their heels, which results in shoes with massive padding in the heel, and a big slope down to the front of the shoe (called a heel drop, heel-toe drop, or offset, in case you go shoe shopping). The angle of the shoe alters your gait and forces you to heel strike.
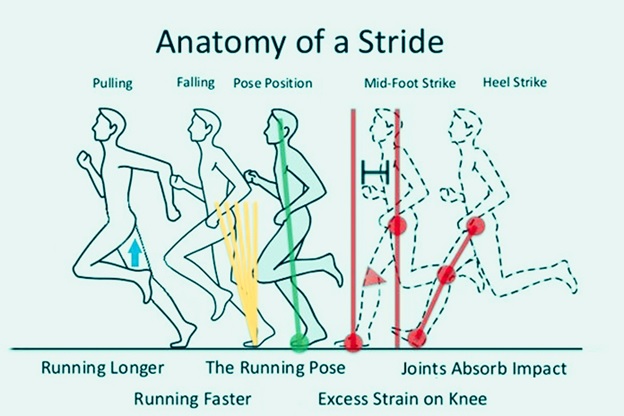
Eventually, you want a shoe that is MOSTLY flat. Your heel will touch the ground briefly after the ball of your foot strikes, but it shouldn’t strike first. It takes A LOT of getting used to, so if you’re switching from a running shoe to something flat, you’ll want to limit the amount of time you spend in the flats, and gradually increase it over time. This means alternating between the flat shoe and your current shoes, until you’ve adjusted. Anyone remember Vibram Five Fingers? They billed themselves as a shoe that could prevent injury. Unfortunately, many who bought them didn’t heed the warnings to ease their transition into them. They started out running their usual volume, with poor gait and no padding, and wound up injured. This resulted in a class action suit against Vibram, which they lost. As a result, they discontinued the shoe.

And, regardless of your pace, we want a cadence of ~180 steps per minute. The more skilled you are, the closer you can get to 200 spm. Sprinters can get up to 230 spm. Again, it should be your lean, not your foot speed that determines your pace.
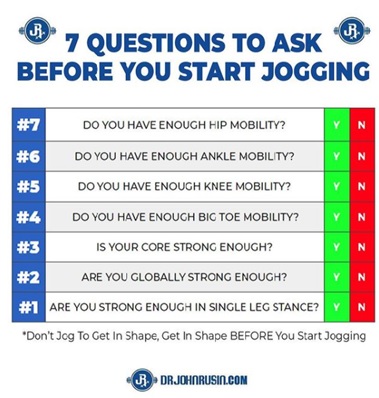
Mobility – to lean properly, and to avoid heel striking, you need appropriate ankle mobility. To properly flex and extend your leg, you need appropriate knee and hip mobility. To maintain your posture, you need a strong core. And, to minimize pain from impact, you need to be strong enough to endure it. This requires general strength, which we can gain through loaded carries and weighted movements, and single leg strength, which we gain through unilateral training (link to article). For specific mobility drills, see a coach, check out Dr. Kelly Starrett on Youtube, or read his book Ready to Run – I have a copy in the gym office, and incidentally I used it to title this blog post.
Finally, we get to running substitutions. If you’re easing your way into running, but you still need to get some monostructural work in, our gym offers rowing, biking, or skiing as a substitute. The standard CrossFit substitution is a 400m run = a 500m row. Why? Because it assumes an athlete that can run an 8 minute mile can also row an 8 minute 2k. Therefore, a ¼ mile run is equivalent in time and effort to a 500m row. I previously wrote a long post on converting from calories to meters and vice versa in rowing, running, etc. It’s fairly detailed, but it still only uses approximations.
If you really want to geek out and individualize your substitutions, we’ll need to get some baseline numbers. We row, bike, and ski for calories or meters. What we’re really trying to access and measure is your effort and the duration of that effort. Rather than estimating your effort, we can measure it in several simple steps:
Step 1: Get on your piece of equipment
Step 2: Set the monitor to measure power output. This is watts for the Rower and Skierg, and RPM for the Assault Bike.
Step 3: Warm-up. Do this by performing 4-5 intervals of 60-75 seconds at an easy pace with 20 seconds of rest between them.
Step 4: After the last interval, during your 20 seconds of rest, reset your monitor.
Step 5: When your 20 seconds of rest comes to an end, SPRINT ALL OUT for 10 seconds
Step 6: Note the highest wattage (or rpm for bikes) that you saw during your sprint
Step 7: That highest number is now your 100% effort. When you’re told to row/bike at some percentage effort in the future, you now have a number off of which to base it.
The measure for running would be an all-out 400m run. Divide your time by 4, and you’ll get your pace per 100m. This is your 100% effort. Why not a 40 yd dash or 100m sprint? Again, we want to ease into running, and going for a max effort short distance sprint too soon is a recipe for injury. 400m is long enough to prevent that.
Once you have your max output, it’s easy to adjust based on the desired intensity of the day. But what happens if the coach doesn’t specify? Well, you can estimate the intensity based on the format of the workout. Generally speaking, the longer the distance of each interval, the greater the total volume, and the shorter the rest times; the lower your intensity will be. A workout with a high rest to work ratio, short sprints, and not that many rounds calls for a high output (>90%). On the flip side, if you take a workout like “Eva” (5 rounds of 800m run, 30 heavy KB swings, 30 pull-ups), there is no programmed rest, it’s a pretty high total running volume, and the intervals are on the longer side. So, output during the run or substitute should be correspondingly low – as in 50-70% of max output, depending on your proficiency with each movement (if your pull-ups and swings take forever, you want to push the run to make up time. If you’re fast through the pull-ups and swings, the run becomes your rest and you’ll want a lower output). Since the run output is based on time, if you decide to substitute another piece of equipment, your time and effort should equal that of your run. For example, if you run a 60 second 400m at max effort, your pace per 100m is 15 seconds. A workout calling for 50% effort in the runs means 30 seconds per 100m. So for “Eva,” 800m at a 30 second per 100m pace is a 4 minute interval. To sub a row for this, you would row for 4 minutes, trying to keep your watts at 50% of your measured max wattage. It all depends on how data oriented you want to be.
We covered a lot in this post. To summarize: it’s easy and free to start running, but you need to be smart. Begin with low volume, increase that first, then increase pace. Work on your mobility issues, strive to master the POSE method, and work toward flat shoes. Substitute rowing, biking, or skiing as needed. You can use the standard CrossFit substitutions (i.e. 400m run = 500m row), you can get a little more specific using the article linked above, or you can truly customize your scaling. To customize – figure out your max output on each machine, and your run. Then, determine what your output should be based on the WOD, and adjust your effort and time accordingly. As you improve in your running, you can retest your max output benchmarks. Rinse and repeat! See you in the gym.